-
×
 Baby Yoda Boo Halloween T-shirt
1 × $15.99
Baby Yoda Boo Halloween T-shirt
1 × $15.99 -
×
 Autumn Dancing Skeleton Pumpkin Halloween T Shirt Sweatshirt
1 × $15.99
Autumn Dancing Skeleton Pumpkin Halloween T Shirt Sweatshirt
1 × $15.99 -
×
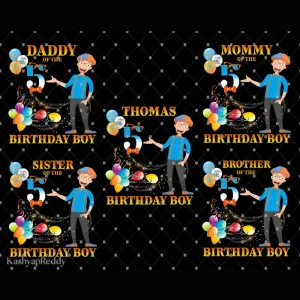 Blippi's Family Congratulations: Thomas' 5th Birthday Boy Digital Files
1 × $0.00
Blippi's Family Congratulations: Thomas' 5th Birthday Boy Digital Files
1 × $0.00
Subtotal: $31.98

As an experienced parent making birthday shirts with SVG files (you can find my previous tutorial on how to DIY Encanto birthday shirt), I’m happy to come back to this post for another tutorial about making your own Frozen Birthday Shirt with an SVG file. With Frozen-themed celebrations on the horizon, I’m thrilled to guide you through the steps of crafting a stunning Frozen Birthday Shirt with an SVG file. Trust me, this process is not only rewarding but also incredibly easy. Let’s embark on this creative journey together!

Before we dive into the crafting magic, let’s make sure we have all our essentials lined up. You’ll need the following items:
✔️A blank shirt that resonates with your Frozen theme.
✔️A cutting machine, preferably a Cricut Maker or Explore Air 2
✔️Iron-On (Heat Transfer Vinyl) in a variety of colors
✔️Standard Grip Cutting Mat
✔️Weeding Tools for precise vinyl removal
✔️An EasyPress 2 and a Mat (An iron or heat press works too, but trust me, the EasyPress is a game-changer!)
✔️Last but most important, a Frozen Birthday Shirt SVG from Giftcustom.

I know, SVG files might sound technical, but they’re your secret weapon in creating gorgeous designs. To kick things off, follow these steps:
If you’re new to SVG files, don’t worry! Check out this guide to learn how to download free Digital files from Giftcustom.
Now, let’s add some extra flair to your Birthday Shirt:

With your design set, it’s time to bring it to life:
A quick tip: Always remember to mirror each mat before cutting when working with iron-on vinyl!

Your masterpiece is almost ready to shine on your birthday shirt:

Make sure your Frozen print maintains its charm and beauty over time with a few simple care instructions:
✔️ Wait 24 hours before washing your shirt
✔️ Turn your shirt inside out before washing to protect the design
✔️ Wash in cold water on a gentle cycle to prevent fading and damage
✔️ If ironing is necessary, do so inside out and avoid direct contact with the vinyl. Use a low heat setting.
Check out our general tips and tricks for washing and storage!
There you have it, your very own Frozen Birthday Shirt crafted with love and precision. Your little one will undoubtedly cherish this special shirt that’s a true reflection of your crafting magic.
If you don’t have time to make your own Frozen birthday shirt, you can buy one from Giftcustom. I have different styles and sizes available for all family members. You can also customize them with your child’s name and age.
To explore more available design options and embark on an enchanting crafting journey, head over to Giftcustom and make every birthday truly memorable!